Saturday, July 20, 2013

cute curly q's - bake with the kids


 I like to bake in the summer. Which is ridiculous because its bloody hot here and heating up the kitchen is the last thing I should probably be doing.  I try to bake things that my girls can help out with.  They are almost 4 and almost 2 so I try to make their tasks simple. There are at least one million crescent roll recipes on pinterest.  Here is my own twist on one of the many sweet treat recipes.

Here are the things you'll need:
crescent rounds (to make them spiral)
all your fillers are up to you
Here are the combos I used:
- cream cheese, cinnamon and sugar
- cream cheese, and blackberry preserves
- butter, peaches, cinnamon and sugar
- nutella and strawberries


Use your imagination and your fridge.
peanut butter and bananas?
apples, butter, cinnamon and sugar?

Just try things out. who knows you may create a masterpiece!

These are remarkably easy. Preheat your oven to 350 F.  Cut any fruit you're going to use into pebble size pieces.


Roll out your crescents. Spread on your butter, cream cheese or nutella and sprinkle on your toppings. 


 (Of course your kids can help you with the sprinkling) Save a little bit of fruit to top the curly cues. Just for looks.

Roll up your crescents into cute curly q's.


Bake for about 13 minutes or until the edges look golden and delicious.


Eat for breakfast lunch and dinner! Oh yeah, don't forget snack time.

Our favorite were the nutella and strawberry curly q's.  The nutty chocolaty sweetness of the nutella and the tartness of the berries melted perfectly into the flakely golden crescent.

Our least favorite (but the most visually appealing) were the cream cheese and blackberry preserves curly q's. They were not quite sweet enough. We used a fruit spread that has no added sweetness. A true preserves would balance with the savory cream cheese much better.

Let me know how it goes and if you find any yummy combos of your own.  Happy hot summer baking!

Wednesday, June 26, 2013

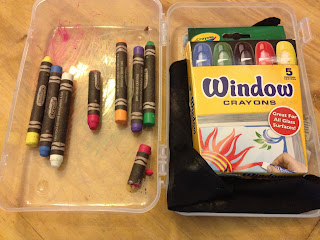
The art of distraction - window crayons

The summer in Houston is H-O-T, hot!!! It is also long.  It starts in April and ends about October. 86 degrees at 5 am and it only gets hotter. We spend a lot of time in doors. It is just too sweaty for this girl and my little chicks.  I'm always looking for ways to prevent cabin fever.  Here is a start to at least 30 minutes of activity.  I bring these out about once a week.

Dry Erase Crayons and/or Window Crayons

They are both great.  The Dry erase crayons are easier to find at the stores and are simpler for toddlers (no choking hazard caps).   Both will come off glass simply with window cleaner or soap and water. 
The best part is, there are no steps for this activity. I just pull up the blinds, remind the girls "windows only" and let them draw.


If your kids are anything like mine, they will also enjoy "helping" to clean up.  Watching their beautiful messy art disappear is part of the fun!

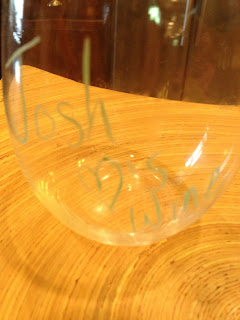
These delightful crayons also have more grown up applications. Try marking glasses and plain plates at parties. You could even let your guests design their own.

Let me know if you have found any other neat uses for the crayons. I'm not sure I could love them any more than I already do, but I'm willing to try.


Wednesday, June 5, 2013

What every little princess needs

We have two little princesses and all the accessories that go with them.  My poor husband had some early delusions of keeping the pink down to a minimum. Hahaha. Well, I do at least two loads of purely pink laundry every week. So, as you might imagine there are a lot of bows, head bands etc. to match all that pink girlyness. This has been one of my favorite pins as it was successful, useful, easy and cute.

The headband holder
 
You only need a couple items for this little winner:
Duct tape (I used two colors)
A flat sheet of duct tape
Empty oatmeal container
Wooden candle stick holder with a wide top (this one was half price at hobby lobby ~$6)
Hot glue
Scissors
Decide on a pattern and how thick you might want your stripes to look.
Cut a square of the duck tape sheet big enough to cover the top of the oatmeal container.  (I just left the lid on.)  Stick it on top and try to smooth down the sides.
One at a time. Cut and place strips of your duck tape down the container.   Long enough to leave a little overlap.
 
You can see I overlapped my stripes.  Better a little lumpy than an oatmeal logo showing through.  I added the "fringe" on the bottom by folding a strip length wise.  I left about 1/2 inch sticky showing so that I could attach to the inside of the overhang.
 
Lastly glue on the candlestick holder.  I just eyeballed the center, but feel free let your inner perfectionist loose and measure it out first.
Here is the shining glory of my craftiness. You'll like it even better once you clear out that drawer full of head bands.
Someone suggested making one twice as tall, which might work if you had a candlestick holder with a sturdy and wider base.  Let me know if you try this one out.  I'm sure your little princesses will love a place to hang their crown. 


Monday, June 3, 2013

That IS pinteresting.

Every time I do something crafty or actually cook someone asks me, "Did you get that from Pinterest?".  Most of the time the answer is yes.  (Of course, I only show my friends and family the successful projects.)  I really enjoy trying out new things from Pinterest even if a lot of them are total flops.  I thought I might share these adventures in pinning with you or at a least write them down so I'm not doomed to reflop.